


カスタマイズされた生産システム
SEAL 事業部
business

products
Appendix
-
INSULATION SETS
-
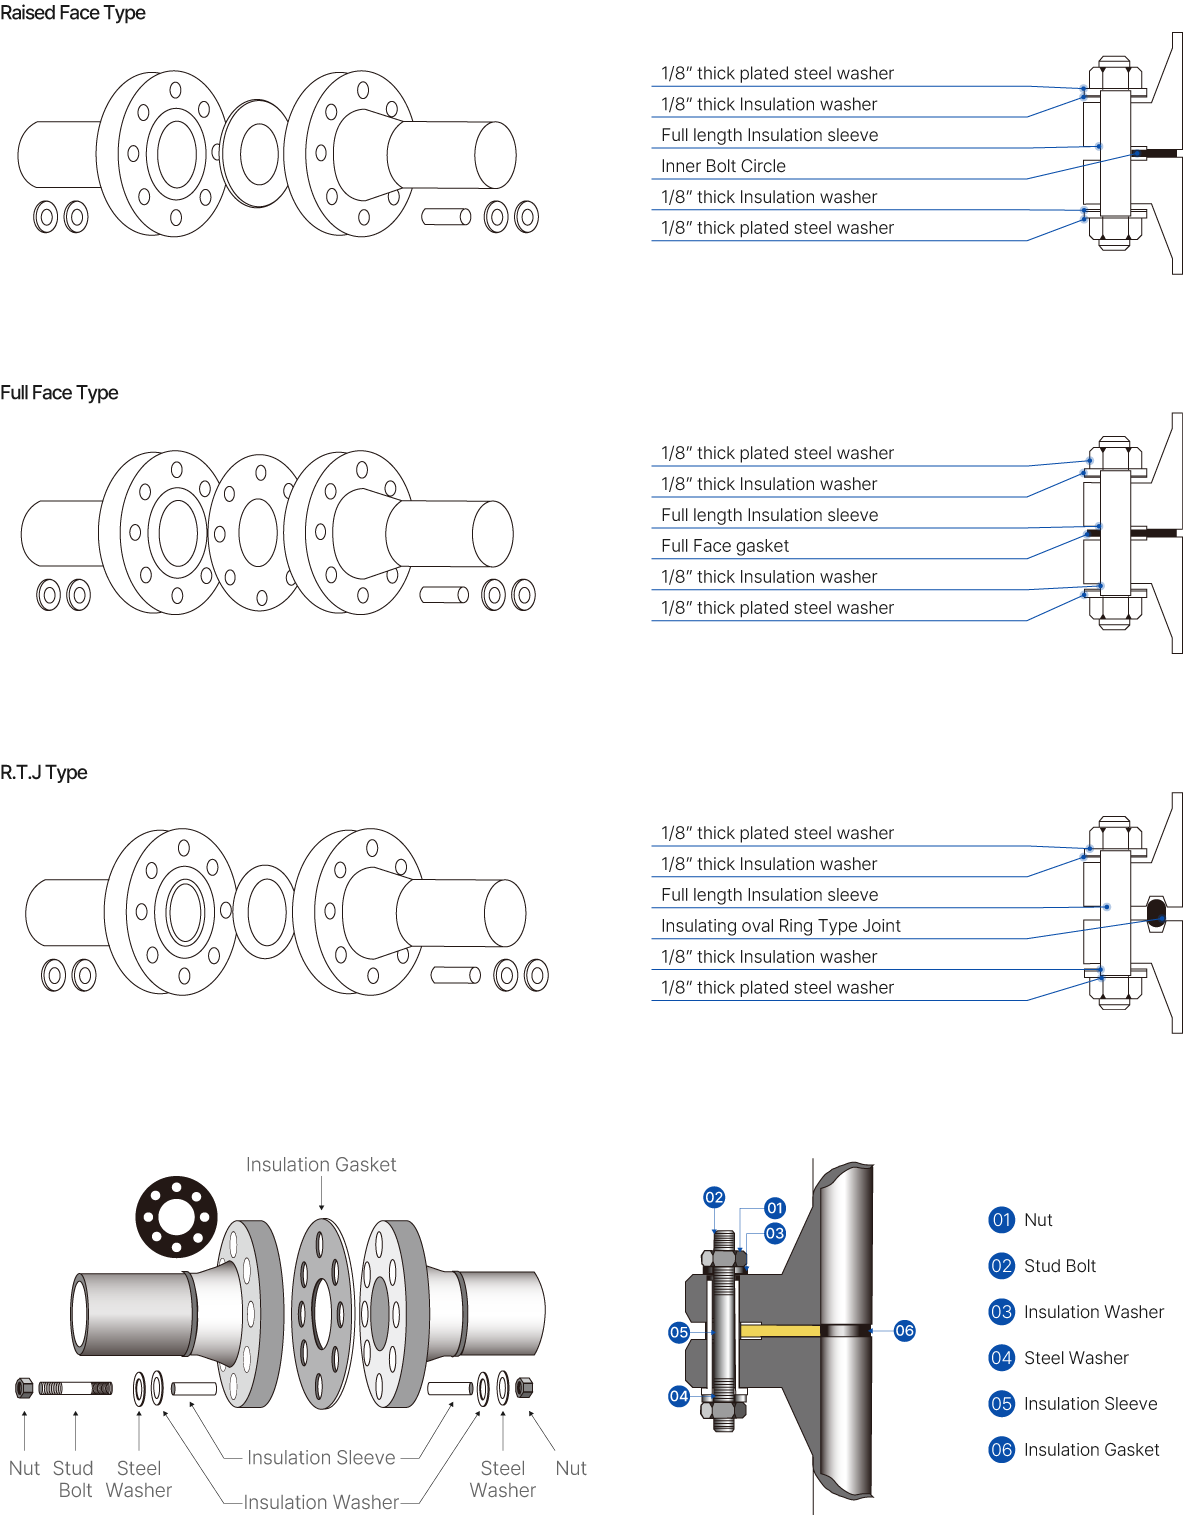
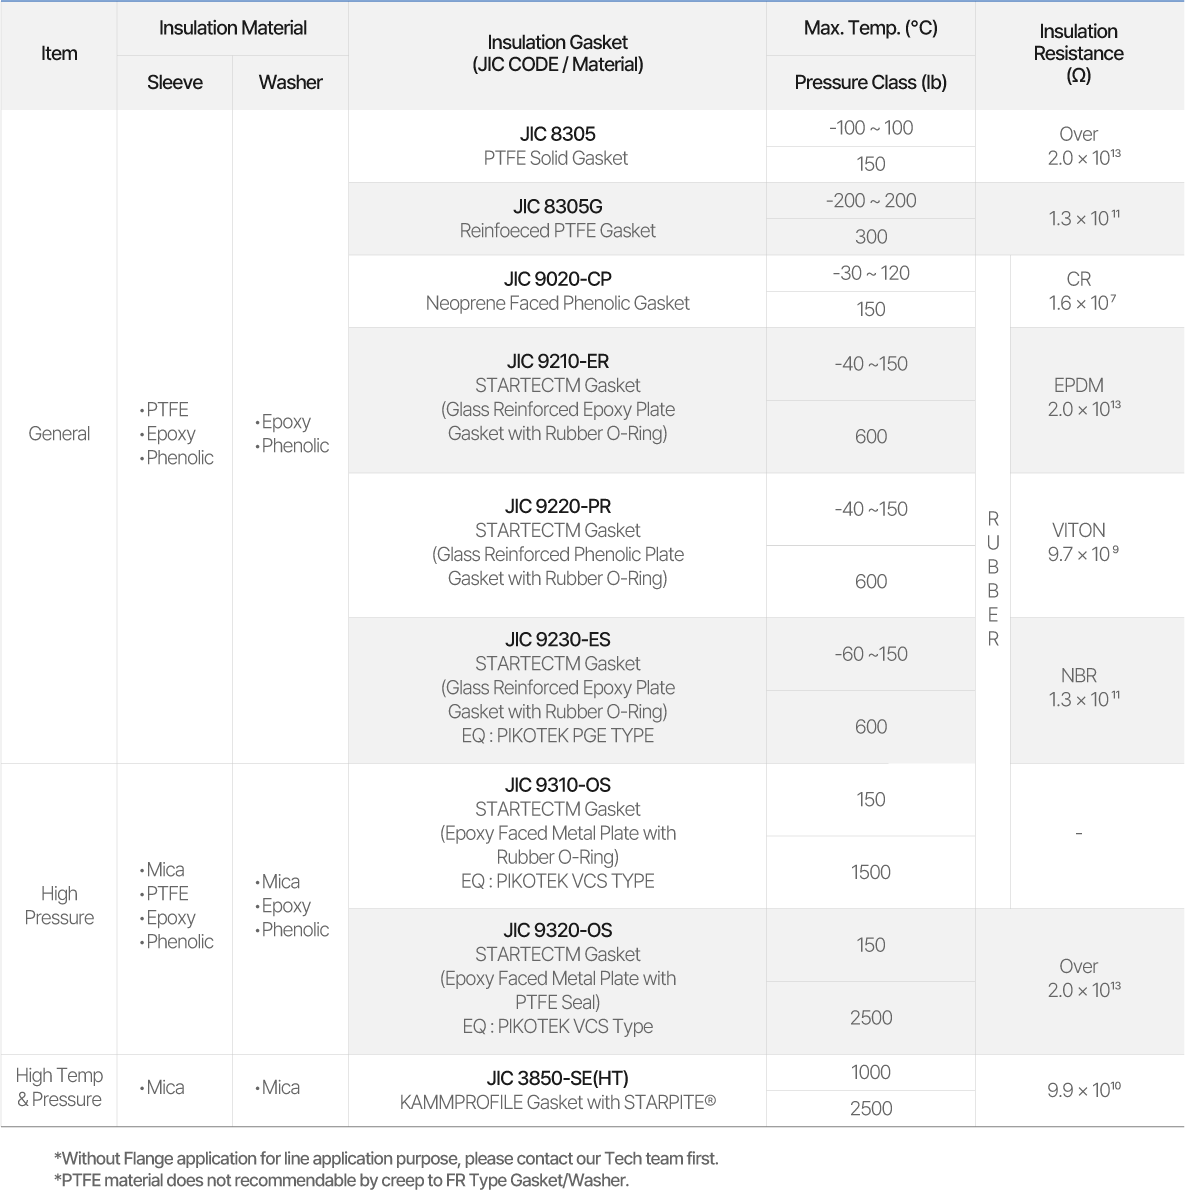
Insulation sets are used for pipeline flange corrosion protection and for complete electrical insulation protection where a seal is required between dissimilar flange materials. There are three standard styles available to suit raised face, full and ring grooved flanges.
지地下配管と地上配管間の電気的保護のために使用する製品。 地下配管を通って地上に流入する電流を遮断し、ショックによる人命被害を防止し、電位差による地下埋設物や異種材質で接続された配管の電気的イオン腐食を防止する。
-
Creative Technology
持続可能な技術開発で
環境を考える企業SEMIFLON
-
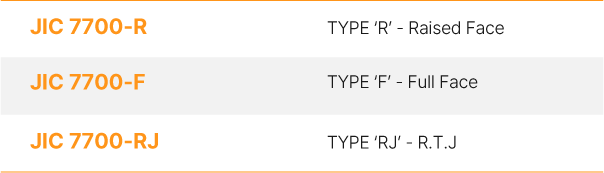
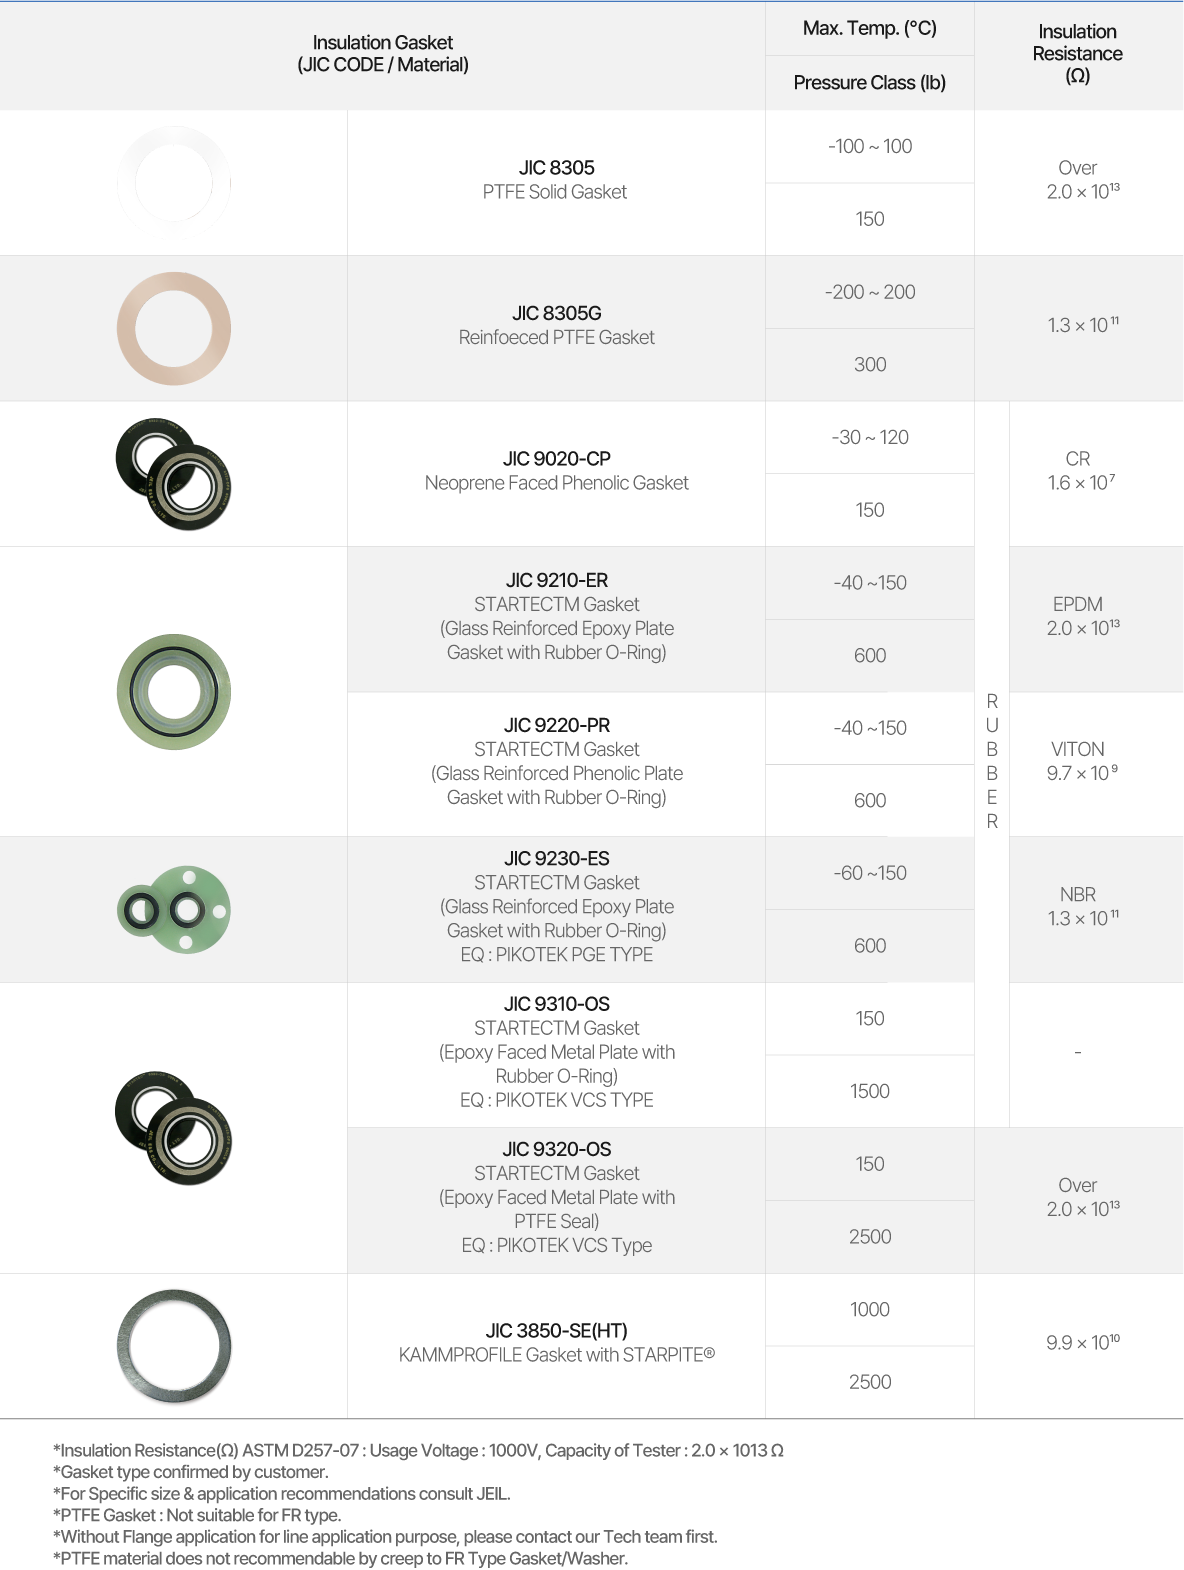
Standard Styles of Insulation Sets
-
-
Bolt / Nut / Sleeve / Washer
-
-
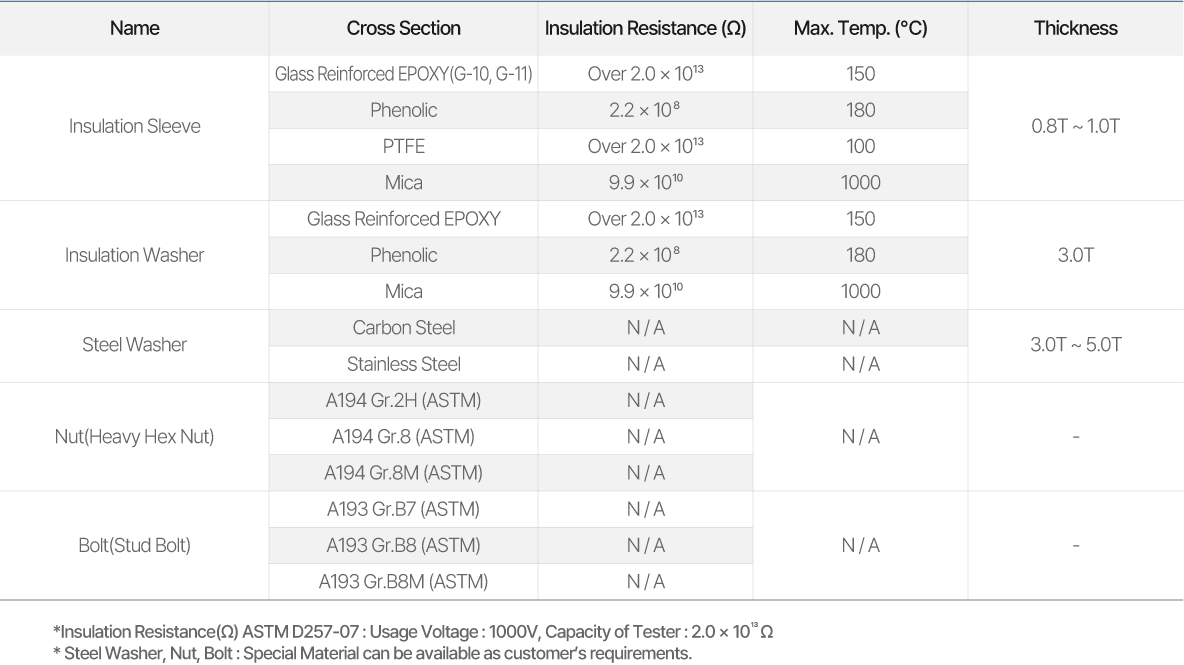
Insulation Set(Isolation Kit) Products
-
-
Insulation Set(Isolation Kit)
取付手順および注意事項 -
-
1. Tools required
Specific tools are required for cleaning and tensioning the fasteners. Additionally, always use standard safety equipment and follow good safety practices.
a. Calibrated torque wrench, hydraulic or other tensioner
b. Wire brush (brass if possible)
c. Helmet, Safety goggles, Lubricant
d. Other plant-specified equipment1. 取り付けツール
Fasterner の Cleaning および締め付け、緩めるために特別な道具が必要である。
必ず規格安全装置を使用し、安全規則に従わなければならない。
a. 剣校正されたトルクレンチおよび油圧またはその他のTensioner
b. ワイヤーブラシ(可能であれば銅/銅製品)ブレーク c. ヘルメット、保安鏡、潤滑剤
d. その他工場で指定した機器
-
2. Cleaning
Remove all foreign material and debris from
2. クリーニング
異物や破片を取り除きます。
-
3. Examine
a. Examine fasteners (bolts or studs), Nuts and washers for defects such as burrs or cracks. Check insulating washers and insulating sleeves are torn or cracked.
b. Examine flange surfaces for warping, radial scores, heavy tool marks, or anything prohibiting proper gasket seating. Make sure the gaskets are isolation gaskets.
c. Replace components if found to be defective. If in doubt, seek advice.3. 検査
a. ファストナー(ボルトまたはスタッド)、ナット、ワッシャーなどの粗い部分、ひびの入った部分などの欠陥がないかどうかを調べます。 絶縁機能が必要な場合は、絶縁ワッシャと絶縁スリーブが破れた部分、割れた部分がないか、欠陥の有無を検査する。
b. フランジの表面に適切なガスキットの取り付けを妨げる反り、ラジアル、または中期マークがないことを確認してください。 ガスキットが絶縁機能付きガスキットであることを確認してください。
c. 欠陥部分が見つかったら部品を変える。 疑わしい点があれば相談する。
-
-
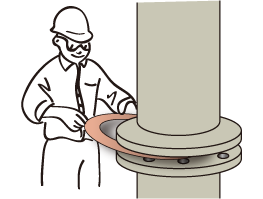
4. Install Gasket
a. Ensure gasket is the specified size and material.
b. Examine the gasket to ensure it is free of defects.
c. Carefully insert the gasket between the flanges.
d. Make sure the gasket is centered between the flanges.
e. Bring flanges together, ensuring the insulation materials (insulation sleeves, washers & gaskets) aren’t pinched or damaged.
f. Put insulation sleeves on the bolts and insert insulation washers and steel washers.4. ガスケットの取り付け
a. ガスケットが指定されたサイズと材料で作られていることを確認してください。
b. ガスケットの欠陥を確認してください。
c. フランジの間にガスケットを慎重に取り付けます。
d. ガスケットがフランジセンター部分にあることを確認してください。
e. 絶縁体(絶縁スリーブ、ワッシャー、ガスケット)を誤って取り付けたり損傷したりしないようにして取り付けます。
f. ボルトに絶縁スリーブを取り付け、必ず絶縁ワッシャーをスチールワッシャーの内側に取り付けます。
-

-
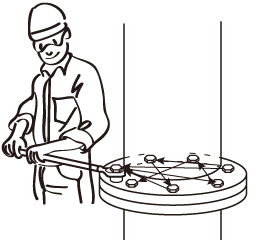
5. Install and tighten fasteners
a. Always use proper tools Calibrated torque wrench or other controlled tensioning device
b. Consult your gasket manufacturer for guidance on torque specifications
c. Always torque in a cross bolt tightening pattern.5. 結束用具の取り付けと締め付け
a. 常に適切な機器を使用してください。
b. トルクガイダンスガイドについては、ガスケットメーカーに相談する。
c. ボルト締め時は常に対角線方向順にする。
-
-
6. Tighten the nuts in multiple steps
Step 1. Tighten all nuts initially by hand (Larger bolts may require a small hand wrench)
Step 2. Torque each nut to ~30% of full torque
Step 3. Torque each nut to ~60% of full torque
Step 4. Torque each nut full torque, again still using the cross bolt tightening pattern (larger diameter flanges may require additional tightening passes)
Step 5. Apply at least one final torque to all nuts in a clockwise direction until all torque is uniform (Larger diameter flanges may require additional passes)6. 多段ナット締め
ステップ1. すべてのナットを最初は手で締めます。 (大きなボルトは小さなハンドレンチを使用できます。)
ステップ2. 30%まで各ナットを締める。
ステップ3. 60%まで各ナットを締める。
ステップ4. 斜めの順序で完全にナットを締めます。 (大口径フランジはさらに締め付けます。)
ステップ5. すべてのトルクが均一になるまで時計回りにボルトを最終的に締めます。
-
7. Re-Tightening
A . Caution
Consult yours gasket manufacture for guidance and recommendations re-tightening.
B-1. Do not re-torque elatomer-based, non-asbestos gaskets after they have been exposed to elevated temperature unless otherwise specified.
B-2. Re-torque fasteners exposed to agrresive thermal cycling.
B-3. All re-torquing should be performed at ambient temperature and atmospheic pressure.7. 再編
A . 注意
再編に関する案内および注意事項については、ガスケットメーカーに相談する。
B-1 . 特に指定がない限り、高温にさらされた後は、ゴムを含む非アスベストガスケットは再締結しません。
B-2 . 深刻な熱変化にさらされた締め付け部分は再締め付けをする。
B-3 . すべての再締結は、大気温度および大気圧で行わなければならない。
-
8. Notes on use
Install a protective cover on insulation sets to prevent exposure on rainy days.
Note : Pay attention Insulation set of Mica material in particular.8. 使用時の注意事項
絶縁セットの装着後、保護カバーを設置して雨天にさらさないようにする。
Mica Sleeve、Washer、Gasketの場合は特に注意が必要です。
